Old World Sourdough
Just “how” I got started with baking Sourdough Bread is not a straightforward story, but I love the way it unfolded in a non-typical fashion as some things in life do…by following the “breadcrumbs” so to speak. The prior year I read a great book called “Mr. Penumbra’s 24-Hour Bookstore” and discovered a new author, Robin Sloan and couldn’t wait to read his next novel. Finally, his new novel was published, and of course it was entitled, “Sourdough”. I was ready for a good mystery with many twists and turns like the previous novel, which did not disappoint, but I also found myself immersed in this geeky world of sourdough baking that I didn’t know existed. By the end of the story, I was so excited to learn and get started that I immediately started ordering supplies and searching recipes and directions online.
It wasn’t only the story that had me motivated, it was my lifelong exposure to the West Coast version of sourdough and the delicious boules filled with clam chowder and chewy dinner rolls. While growing up in the PNW, white, commercial sourdough had become a mainstay in restaurants, diners, delis and even fast food. I was already a fan, but everything changed when I discovered rustic sourdough at the “Three Sisters” bakery in Seattle’s Pike Place Market, and it was nothing like the commercial version we were accustomed to. It had a thick crust and was chewy and flavorful with rosemary and kalamata olives. When I set out to create my own bread, this was the result I envisioned: rustic, crusty, chewy and dunkable!
Many people have asked me how I learned to make Sourdough, so I’ve laid out the process for you to create your own starter and delicious bakes from the start. The following instructions represent many different research paths, lots of experimentation over the span of a year and hands on instruction. While there are several methods to choose from, these are the steps that eventually enabled me to create consistently great bakes.
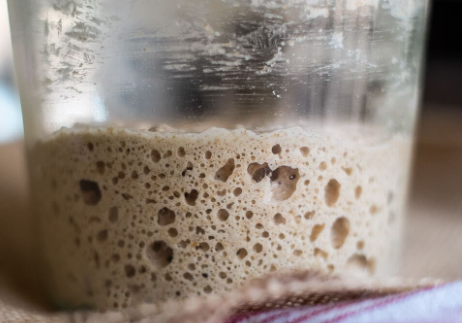
One last note on the book Sourdough, and the fun “geeky” quirks of the bakingverse: since your starter is a living organism made of flour and water which ferments to create a healthy store of lactobacillus acid, it will need care and feeding to keep it alive, and it needs a name. My starter is affectionately called “Doughtard”, and if you want the origin story, look up news articles from the 2017-ish time frame :).
Care and feeding of your live starter:
Name your starter: Like all good living organisms, it needs a name!
Daily bakers can keep the starter in a covered jar or crock on the kitchen counter. At room temperature, the starter should be “fed” or refreshed daily.
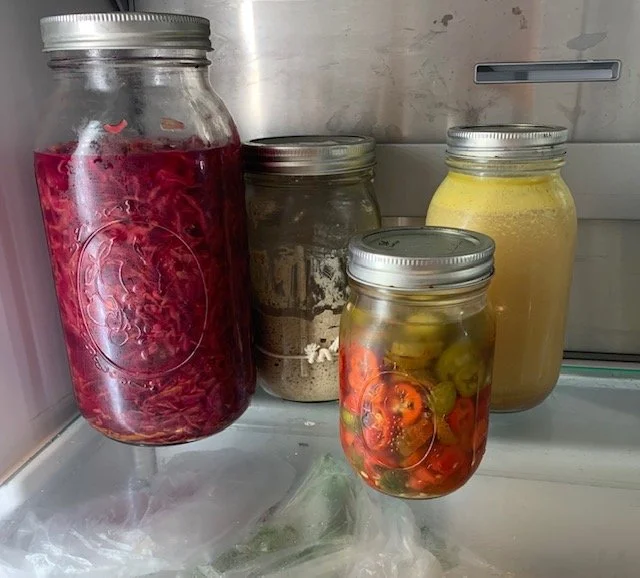
Frequent bakers: Store the covered jar in the refrigerator and feed weekly (or as long as two weeks). If a dark liquid “hooch” forms on the top, pour it off before feeding.
Create your starter
Tools:
Dark Rye Flour
Qt glass jar (string tie opt)
Bottled water
Digital Scale
Formula:
100g dark rye flour
100g water ~80 degrees
Instructions
Day 1: Sourdough Starter Creation
Mix the ingredients in glass jar
Move string tie to level of starter (allows easy viewing of the “growth” of your starter)
Cover loosely so air can circulate into the jar
Store on counter in warm kitchen at least 72 degrees
Day 2 – 12: Daily Feeding:
Daily Activity
Discard approximately ½ of your starter
Add 50g Dark rye flour
Add 50g warm water
Stir vigorously and replace lid, return to counter


Dough Preparation
Tools:
Dark Rye Flour Tea or kitchen towel
White bread flour Proofing basket
Small glass bowl Plastic bag (large enough for proofing basket)
Lg glass bowl Dutch oven or baking cloche
Bottled water Parchment
Digital Scale Wooden spoon
Bench scraper
Notes on room temperature: If your house is cooler than 72 degrees, consider using a proofing oven or another method to keep your dough warm as it is processing. It needs to maintain 70-75 degrees to enable the fermentation process. You can place a baking dish of warm water under the bowl or purchase a proofing pad with a cover and adjustable temperatures.
Step 1: Prepare the Leaven
Leaven Formula:
Starting with a leaven is a step that some methods omit, however, this step was crucial for me to create consistently great bakes. It is very simple, and you can do it in the evening right before you go to bed, and it’s ready the next morning. Allow at least 6 hours.
2 Large Tbsp rye starter from your jar
50g white flour
50g water ~80 degrees
Mix the Rye starter in a small bowl with the warm water until liquified. Mix in the White Flour, stirring vigorously. Cover with a wet kitchen towel and leave on the counter overnight.
Refresh your starter as you did in Day 2 -12. At this point you can refrigerate your starter.
Step 2: Mix the Bread
BASIC sourdough formula for beginners (Times are used to illustrate the steps and wait times throughout a day)
Leaven (as prepared above)
500g white bread flour
350g warm water
10g good quality sea salt
Mix and Autolyze: (10:00-10:45 AM) Mix together the leaven, **300g** warm water, white flour. Mix with spoon and/or hands to incorporate water to all of the flour. Cover with wet towel in warm kitchen and let sit for 30 minutes. In this step, the flour is absorbing the water and beginning to “bloom” and begin its chemical processes.
Bassinage and Salt Add: Add ½ of remaining warm water with salt. Mix into dough by hand. For some advanced formulas, this is the step to add inclusions such as seeds and herbs.
Stretch and Fold: (11:00 - 1:00 PM) Stretch & fold dough by pulling one side over the top of the dough and pressing into the opposite side. Turn the bowl 1/4 turn and repeat stretch and fold 20 times. Cover with wet towel in warm kitchen and let sit for 30 minutes. Repeat process 3 additional times, each time reducing the number folds by 5 and being increasingly gentle to prevent the gluten strands from excessive tearing. This step is creating a “web” of gluten strands that will develop the crumb and pockets so desired in rustic sourdough.
Bulk Proof: (1:00 - 3:00 PM) Let dough continue to proof in bowl in warm kitchen ~72 degrees
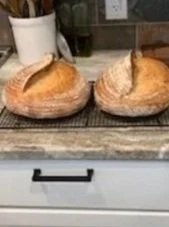
Shape: (3:00 - 3:15 PM) Remove dough onto floured counter Shape into a round by gently turning the dough while on the counter (like a steering wheel) and then with your hands on the counter with palms facing toward you, pull the dough toward you several inches. You should see the top of the dough begin to stretch. Turn 1/4 to the left, and pull toward you again. Repeat 3-4 times. This will form a smooth tight crust.
Gently place into prepared (well-floured) proofing basket
Cover sides and top with rye flour
Place basket in plastic bag and loosely twist to close
Proof/floor Time: (3:15 - 4:15 PM) Use this method if you want to bake in the same day. It will produce a milder flavor.
Leave dough on counter to puff up (test proofing by poking the side after 30 min).
Immediately bounces back: Under-proofed (give it more time and test every 15 min)
Gently answers back: Ready
Stays indented permanently: Over-proofed, make focaccia
Proof/Retard Method: (overnight) This is a longer proofing resulting in a stronger sourdough flavor, and the longer fermentation creates a more digestible bread.
Refrigerate the dough in the plastic bag overnight
Baking
Preheat oven and baking vessel: 500 DEGREES. Put your baking vessel in the oven while it’s preheating. Ensure your racks are appropriately spaced for your dutch oven or cloche.
Place a small sheet of parchment on top of your dough and turn it out, carefully loosening the sides to release as you go. Hold your lame at a 45-degree angle and make a quick slice across the dough’s skin in the shape of a wide smile. This will create the coveted “ear” while allowing steam to escape during baking. Quickly transfer the dough to your baking vessel (keep it on the parchment during baking, this makes moving the dough so much easier).
Turn temperature down to 350 degrees and bake for 40 min with the lid on. REMOVE LID & continue to bake for an additional 10-15 min.
Check for doneness: Using spatula, lift one side of bread and tap the bottom of the bread with your fingertip. It should have a hollow thud. Color should be deep golden (not pale). Move to wire rack to cool for at least 30 min before cutting. It’s going to be tempting to dive right in, but the texture may be “gummy” as the gluten crystalizes. Wait for the bread to be barely warm to the touch to get the best texture.